
LVNAuth Tutorials - Character Dialogues
To show that a character is speaking using words, we can use dialogue text.
Dialogue text requires two things:
1) A dialog rectangle - the character's text will appear within this rectangle.
2) A font sprite sheet
Character text can only be shown in a dialog rectangle. The boundary of the text is the size of the dialog rectangle. The size can be configured.
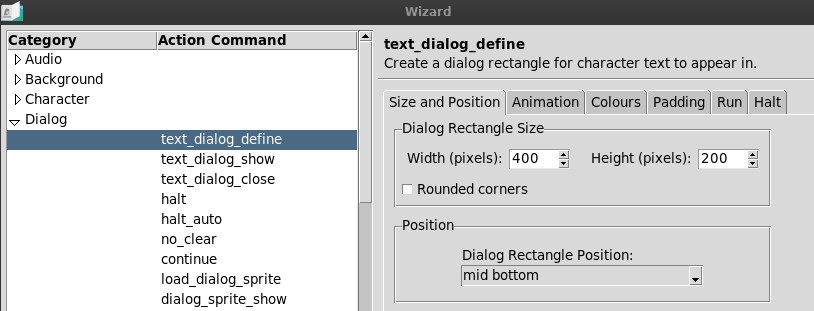
Creating a dialog rectangle can be done with the command: <text_dialog_define>.
That command has lots of options, so it's recommended to use the Wizard button to set all the options.

You can set the rectangle's size, position, colour, padding, and a bunch of other options.
Once you're happy with the settings, click OK in the wizard to have it generate the <text_dialog_define> command with the chosen options.
So now we have a dialog rectangle. To make the dialog rectangle appear in your visual novel, use the command: <text_dialog_show> after you define your dialog rectangle. There are no further parameters or options for that command.
After the text dialog rectangle has been defined, we can start to decide which font sprite sheet we want to use in the visual novel. LVNAuth does not use traditional fonts; it uses font sprite sheets, which are bitmap images (usually in .png format) where all the letters are on the same image.
The usage of font sprite sheets has its own dedicated tutorial page. After you read that tutorial, come back to this page to resume the tutorial.
After the text dialog rectangle has been defined and a font sprite sheet has been configured, we are almost ready to show character dialogue text on the screen.
The next step is to tell our visual novel which font sprite sheet we want to use.
We do that with the <font> command. The font sprite sheet I'm going to use in this tutorial is called goodneighbors_update2_30_42. So I can write the command as follows:
<font: goodneighbors_update2_30_42>
It's important to use that command before any character dialogue text.
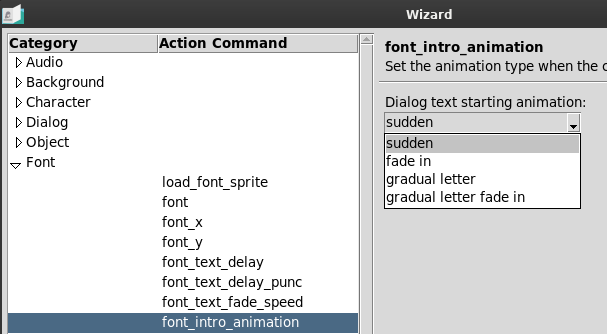
We can now specify the type of font animation we want to use for the letters of the font sprite sheet. As usual, the Wizard button makes this a breeze.

For this example, I'm going to use the animation: gradual letter, which means it will show letters like a role-playing game (letter by letter).
The command for setting the text animation is like this:
<font_intro_animation: gradual letter>
Character texts have no special command in LVNAuth, you simply type the words you want your character to say.
For example:
<character_show: Theo_Normal>
Hi, my name is Theo.
I hope you find this tutorial to be useful.
The first line in the script shows a character's image. The following 2 lines are dialogue text. Notice how dialogue text uses no special command - it's simply just typed text.
LVNAuth ignores blank lines, so if you want to show a blank line in your character's dialogue text, use the <line> command. An example is below:
Hi, my name is Theo.
<line>
I hope you find this tutorial to be useful.
The <halt> command is used to allow the viewer read the dialogue text before showing more text. The viewer can left-click on the mouse button to proceed with the next block of dialogue text.
Here is an example:
Hi, my name is Theo.
<halt>
I hope you find this tutorial to be useful.
After <halt> is used, the dialogue text is cleared and the next line is shown to the viewer. If you don't want the dialogue text to be cleared after using <halt>, use the <no_clear> command before <halt>.
Here is an example:
Hi, my name is Theo.
<no_clear>
<halt>
I hope you find this tutorial to be useful.
Now the words, "Hi, my name is Theo", won't get cleared when it shows the next dialoge text, even though it will still stop and wait for a left-mouse button click.
You can make the dialogue text stop for a short time and then continue automatically instead of requiring the viewer to click the left-mouse button. This is useful for showing narrative text. To do this, we can use the <halt_auto> command.
Here is an example:
Hi, my name is Theo.
<halt_auto: 120>
I hope you find this tutorial to be useful.
This will cause the dialogue text to stop for 2 seconds when it reaches <halt_auto>. The value of 120 is the number of frames to pause. LVNAuth plays visual novels at 60 frames per second, so 2 seconds is 120 frames.
When <halt_auto> is used, the viewer cannot click the left-mouse button to resume the dialogue text - they are forced to wait for the specified number of frames to elapse.
It's possible to show differnet fonts while a character is speaking through dialogue text.
As we saw earlier, simply use the <font> command to choose a different font.
The <continue> command can be used to show text on the same line, even when a new line is reached. This is useful for changing fonts in the middle of dialogue text.
Here is an example:
1. Hi, are you
2. <font: boxy font>
3. <continue: 5>
4. new
5. <font: goodneighbors_update2_30_42>
6. <continue: -5>
7. here?
I've numbered the lines so I can explain what each line does.
Line 1: Dialogue text that is using the original font (goodneighbors_update2_30_42)
Line 2: We're changing the font for the letters that will follow next, to a font named boxy font.
Line 3: We're using the <continue> command to indicate that the next dialogue text should continue on the same line as the previous dialogue text. In other words, 'Hi, are you ' will be followed by the word 'new' all on the same line.
The value of 5 means to move down the following letters by 5 pixels. To move letters up, change it to a negative value. The reason for this is because the height of the new font (in this example) is different than the old font, so if we try to display the two fonts side by side, the vertical positioning of the two fonts will be different.
The <continue> command accepts an optional vertical offset value, which is what we're using here. However, you could also use <continue> by itself with no value.
Line 4: The word 'new' will be rendered with boxy font and will continue on the same line as the words, 'Hi, are you'.
Line 5: We're changing the font to the old font, which means any words after this will use the old font.
Line 6: We're indicating that the next dialogue text should continue on the same line as the previous dialogue text and should be positioned 5 pixels higher.
Line 7. The word, 'here?' will be shown on the same line as the previous dialogue word (new).
The end result are the words "Hi, are you new here?" being displayed all on the same line, but with the word 'new' using a different font.

The Wizard button at the top of the script editor will guide you with the use of commands in your visual novel and will show information about them. The commands that we covered here are all listed in the Wizard, under the Dialog category.

Last updated: Wed 24 January 2024