LVNAuth Tutorials - Decision buttons
You can ask the player to make decisions that branch the story, allowing characters to respond differently based on their choice.
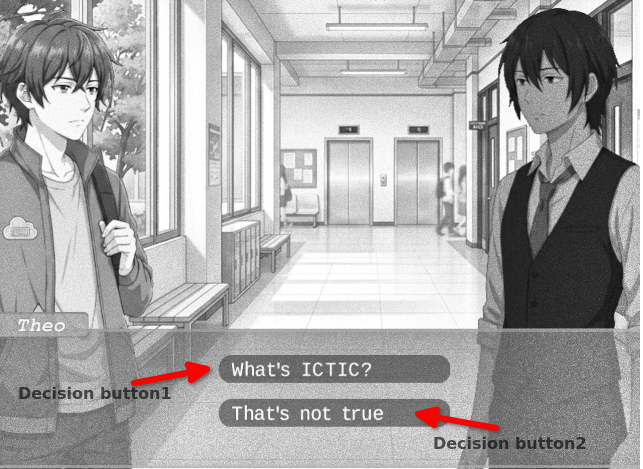
To present these choices, we will use button sprites that the player can click to confirm their decision. LVNAuth's built-in commands let you overlay text directly onto these sprites, meaning we can reuse the same button asset.
To keep things organized, we will also create a couple of reusable scripts to handle the choice logic.
We need a button - something the player can click on to confirm their choice. The button will be a sprite image of your choice.
Create one single image of a button with your favourite image editing application. Then add the image to the Dialog Rectangle section in your project.
You can use this button image if you'd prefer:

License: CC0 1.0 Universal
You don't need to bake text into your button images. By using LVNAuth to overlay text directly onto a blank sprite, you can reuse a single button asset for any situation in your story.
While you can still add text using an image editor before importing, doing so means you'll have to create a unique, separate sprite for every single choice.
In my example, I'm going to name my button sprite: button_regular
In the chapter's script, load the sprite. We're going to spawn 2 copies of the sprite, because we're going to ask the player 2 questions.
# We have to load the original button
# sprite, before we can make copies of it.
<load_dialogue_sprite: button_regular>

# Spawn 2 copies of the button sprite (from button_regular)
# and name them button1 and button2.
<load_dialogue_sprite: button_regular load as button1, button1>
<load_dialogue_sprite: button_regular load as button2, button2>
The first button will have an alias: button1
The second button will have an alias: button2
Sprites can show text, similar to how the dialogue rectangle can show text. We need to specify which font we want to use for button1 and button2.
My font is called: button_text
You can reuse your character dialogue font or create a custom font sprite sheet using the Trace Tool at the top of the LVNAuth editor.
Load the font sprite sheet in your chapter's script:
My font is named button_text - change the name based on your font name below:
<load_font_sprite: button_text>
In the reusable script, show ask, we're going to use the script below:
# We have to show the buttons first,
# before we can do anything with them.
<dialogue_sprite_show: button1>
<dialogue_sprite_show: button2>

# You may need to change the positions for your
# own visual novel.
<dialogue_sprite_set_center: button1, 631, 670>
<dialogue_sprite_set_center: button2, 631, 725>

# The font to use for button1 and button2
<sprite_font: dialogue_sprite, button1, button_text>
<sprite_font: dialogue_sprite, button2, button_text>

# Mouse hover enter/leave for button1
<dialogue_sprite_on_mouse_enter: button1, on hover enter button, button=button1>
<dialogue_sprite_on_mouse_leave: button1, on hover leave button, button=button1>

# When the player clicks the sprite (button1)
<dialogue_sprite_on_mouse_click: button1, record answer, answer=blue>

# Mouse hover enter/leave for button2
<dialogue_sprite_on_mouse_enter: button2, on hover enter button, button=button2>
<dialogue_sprite_on_mouse_leave: button2, on hover leave button, button=button2>

# When the player clicks the sprite (button2)
<dialogue_sprite_on_mouse_click: button2, record answer, answer=red>

# Where to start the sprite text for button1 (the position)
<sprite_font_x: dialogue_sprite, button1, 16>
<sprite_font_y: dialogue_sprite, button1, 8>

# Where to start the sprite text for button2 (the position)
<sprite_font_x: dialogue_sprite, button2, 16>
<sprite_font_y: dialogue_sprite, button2, 8>

# The text to display on the sprites (button1 and button2)
# The text is taken from two variables: text1 and text2
<sprite_text: dialogue_sprite, button1, (@text1)>
<sprite_text: dialogue_sprite, button2, (@text2)>

# Pause the character dialogue text and wait for
# the player to make a decision.
<halt_and_pause_main_script>
This reusable script will be responsible for recording the player's answer and unpausing the visual novel.
# Record the answer to a variable named: answer
# (@answer) is the decision being sent to this reusable script.
# The plain 'answer' (with no @) is the variable name where
# the answer is being recorded.
<variable_set: answer, (@answer)>

# Now that the player has made a choice, hide the two choice button sprites.
<dialogue_sprite_hide: button1>
<dialogue_sprite_hide: button2>

# Advance the story and allow the visual novel to continue
# because the player has made a choice.
<unhalt_and_unpause_main_script>
This is put in a scene script, not a reusable script.
# The character asks
What's your favourite colour?

# Offer two choices to the player
# The visual novel will wait for the player's decision
# because the reusable script, 'show ask', uses the
# command: <halt_and_pause_main_script>
<call: show ask, text1=I like blue, text2=I like red>

# Did the player choose 'blue'?
# Read the variable named, 'answer', to find out the choice.
<case: ($answer), is, blue>
Nice!
Blue is the colour of the sky.
<case_end>

# Did the player choose 'red'?
# Read the variable named, 'answer', to find out the choice.
<case: ($answer), is, red>
Nice!
Some flowers are red.
<case_end>

# Stop and wait for the player to see the response.
<halt>
Last updated: Tue 07 July 2026